Friday, October 13, 2023

If I was to start all over with a new 80 series, what would I do different...

If I was to start all over with a new 80 series, what would I do different now that I have learned from my mistakes.

I would get the cleanest 1995 white unmolested rust free 80 I could find. In the end, it is worth the extra money. Then pull all the PMs & stop all the leaks. Now that is over & done, its time for the fun to begin.

I would get on order as follows:
4" Hyperflex arms from Xtreme Overland. 
Dobinson front C97-146vt 2.5" lift front coils that nets 3" of lift & rear would be ToughDog 2"  TDC949SL (220/280#).  
Shocks would be the Ironman Foam Cell Pro, 6" front & 4" rears. 
SS braided ext. brake lines, all 7 lines. 
Then order up some Timbren AOR 80 series front & 100 series rear bump stops.

Now before I get all that stuff in, I would unbolt & take off the front fenders.
Bust loose the front control arm & panhard bolts. Then take out the stock coils & shocks, then temporally install two hockey pucks to each front side bumpstop.
Bolt on the 39s then articulate the front axle with a tall hydraulic floor jack & 12 ton jack stands. To get a feel of what it will take to trim till the 39s stop hitting metal. Cant really get final cuts till the Hyper arms & eimkieth stuff is installed. The goal is to trim out the forward section of the inner fenders. 
Next will be moving the front axle forward 1" via drilling a 18mm hole in the front control arm frame mount. Redline Cruisers makes them or can be DIY.


Remove batteries so I can make a horizontal slice then push it up 1.25 at the end then drill & bolt together. (simpler said) The 24R/34R batteries can be rotated 90* degrees & slid inward closer to the radiator. If I did it like Clifford the red 80 raising the whole fender, I would lose the air box like he did. Yeah, No Go...
 Here is "Half-Ass" See they cut the fender up under where the battery goes to clear a 39" tire 

The outer core supports will need to be trimmed back to the front body mounts. 

For the rear I would order up some Dobison adjustable upper & lower control links because they use OEM rubber bushings that absorbs vibration better and gives a smoother suspension ride. Then
 adjusting them .5" longer than stock.

Then take out rear stock coils & shocks then mount the 39s on.
Drop 80 strait down on the rear fender then get under the rig & measure how far away the stock bump stops are from the axle. If around 4" then I would be in ball park but if 6", that a lot of hackin...
I would then cut like this to separate the inner & outer sheet metal.
Then I would draw an 40" half arc on some cardboard & cut it out. Then get the cardboard arc & draw a line above the rear fenders. Then pie cut outer sheet metal up to within 1" of the 40" line. Pull pie cuts out up & away to the outside to allow a articulated 39 to go up in there.
Then I would pie cut the inner fender on top 1st then to the rear all the way to the solid vertical section.
Then articulate the 40 one at a time till the 80 raises off the jack stand. Then check how far away from the axle to bump stop. Finish pie cutting the outer fenders to then fold outer fenders 90 degrees so I could then match up inner/out fender sheet metal so I could rivet the fender back together & fiberglass the inner fenders to seal it. See below.


Also when articulating make measurements for the shocks up/down. Make sure the shocks do not bottom out.
Then at this point measure compressed/extended measurements. Ironman foam cell shocks that baldilocks has. The idea is non charged shocks don't push upward to cause roll.

Install rear coils sit on ground & enjoy the view & drink a beer.


After that there is more to do to get trail ready, but at least now you can drive.

Saturday, September 24, 2022

AOR Timbren Active Off Road Bump Springs for my 80 series Lx450

 Hello all, as you know I have been on a Low Lift/Big Tire phase with my 80 series Lx450.
To run a low lift with big tires I realized the sacrifice is up travel. The Lx450 has been running with approx. 3 to 4" of up travel which leads to hitting the bump stops on a normal basis. After a while it gets annoying though, the remedy is a bump stop upgrade. I decided to go with the Timbren AOR bump spring. I found a front set for $225 from Just Differentials, it took 8 weeks to get here, then found out they sent the "SES" version which are stiffer. I did try them out & they are a bit firmer than I wanted (SES is for constant load bearing). This sent me into a research frenzy. After few days research I learned what I needed to make a better choice on the next purchase. The current retail price for the Timbren AOR spring with brackets are $297...yeah, UGG.
 Through my online forum I learned about how much they compress etc... I decided I could DIY the rear brackets myself with 2" square tube & purchase the AEON spring separately for $99 per pair. The front bracket are offset, but still can be done DIY with 1.5"x3" square tube. 
Now you know the story here are a few of the specs with pictures.
The normal AOR spring from Timbren for the 80 series comes is an A515-55 which in a nut shell is 3.75" tall & compresses down to 1.5" tall. It has a total load capacity of 2,400#
The SES AEON spring that came to me has an A515-65 with same height & compression specs but with a firmer 4,000# capacity. 
After doing the research I decided to go with 2 sets of the A530-55 AEON springs that are taller with more travel. They are 4.75" tall with .5" more travel at 2.75" & compress down to 2" the load cap. is 2.800# (taller & more travel means MoBetter)
Here are some pictures.
The bump needs to go forward a bit more.
We as in me, myself & I need to do a we bit of grinding.


The A530-55s bolted on the 2" square tube.

I was going to mount them like this, but was able to get them further forward with the other brackets.

My axle is 1" further forward than stock, so I drilled a hole 1/2" forward & it landed dead center on the axle. I did grind on the passenger bracket to prevent coil rub, no coil rub so far.


Thursday, August 4, 2022

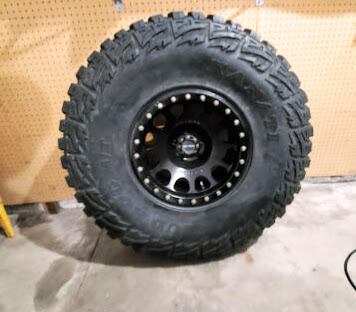
39x12.5r17 Kanata Mud Hogs


Low Lift, Big Tires on a fzj 80 series is equals 2 to 3" of up-travel. (38"s, 39"s, 40"s)


A few years back I played a game to see just how low I could go with 37s on a 80 series. I learned a lot & will share it with you today. 37s will fit with 1" suspension & 1" body lift with 1" front/1.5" rear lowered bump stops. 
(If you have a 2" suspension lift then run 2"front/2.5" rear bump stops). 

When I fitted 38s on a 2" suspension/1"body lift, I used 1" front/2.5" rear bump stops after moving the axle forward 1". 

Just to note: the starting point...stock front up travel including compression is 3" the rear is 4.5".
Front bump stop gap is 50mm/2" for fzj80 series.
Rear bumps are hard... maybe .5" of crush if hit hard enough. 
Fronts crush 1.5 if jumping.
So under normal conditions if you add the 2" of up-travel plus 1" of crush the normal 80 series has 3" of up-travel in the front.

Now you know the spec, here are some 80s I found on the WWW.
~~~~~~~~~~

This guy tubbed the inner fenders stock lift & 40"s
His up-travel is 3" front, 4.5" rear.

Builds - Project Clifford 40" Tires 0" lift | IH8MUD Forum


This rig is called HalfAss, this rig lost a bunch of wieght in the rear so they had to add 2" coils sacers in the front.
4" lift
@joez  3.5" lift
@Expo max has 4" total lift in the pic.
This rig lost a lot of weight so his up travel is more than stock.
No lift 36" bias IROKs
37" Pitbull's on stock coils, later installed a 2" TJM lift.
38x11.5r16 on 2" lift (30mm spacers & 1" body lift).
Cooper STT Pro 37x12.5r16s
38x13.5r17 on a loaded 2.5" lift (1.5"lift +1" Body lift).

39x12.5r17 on 4' Slee LIFT
Broski has a 4" lift with gutted fenders on 39x12.5r17 Mud Hog

Heavy 4bt on 3" lift with 42s (3.5" 144VT/TJM 2" progressive)

NorthWesTaco 850J/863 3.5" lift on 40s
https://forum.ih8mud.com/threads/northwesttacos-80-series-crawler-slammed-on-4ds-and-bs.1007085/post-11184161
trimmed his rear fenders.

Sunday, July 3, 2022

GadgetMan Groove

Okay, hello, Gary GW Nugget.

I told you about a groove in the throttle body that increases fuel vaporization which means more complete burning of the fuel. 
In most cars 60% of the fuel goes out the pipe for the catalytic converter to finish burring up the rest.
Hmm... why is that I ask.

I bought a throttle body... gunna get the groove on it & report back.

If you curious enough to watch a couple vids here you go.

60% of the fuel goes out the tailpipe. Your car was designed to do that. 
New Technology Draws Power From Exhaust
Happy customers say get groovy.
Get better mileage with The Gadgetman Groove

78% Better Mileage on a 92 Cherokee Laredo? YES WE CAN!

Intake Mod Gadgetman Groove Ron Hatton

Monteray Granny, said she feels like Mario Andrade's Mom.

Dropping Temps on a 2001 Expedition with NO PARTS
 
Interview with Ron Hatton.

Pulstar Pulse Plugs (Iridium) VS NGK Iridium Spark-Plugbench test... You...

Saturday, June 25, 2022

Difference in OBD1 & OBD2 throttle bodies 1fz-fe 80 series

Toyota 22210-66030 is OBD1 (93 thru 12/94)

Toyota 22210-66031 is OBD2 (1/95 thru 97)

The (TPS #89452-22090) & the (IAC #22270-6601) are good 93 thru 97 


Wednesday, June 15, 2022

(5 minute) 7 pin mod also OD in low mod in 5 minutes. 80 series fzj80 Lx450


Hello all... @shoredreamer showed me this mod back in 2018 & now I wanted to share it with you.

I haven't seen this in any other threads so I thought put it here.

The black wire with a blue stripe is the famous 7 pin mod wire. It is normally moded on the left driver side floorboard panel, but the way I did it was by removing a connecter from the top of the transfer case. The yellow wire removed allows the transmission to go into OD overdrive while in Low. Yes 4 gear in Low...

The connecter to remove is the #1 circled connecter.

This diagram is for the smart folks to read.

(My rig is a 1997 Lx450) = 95-97

93-94 might be a little different.

If you have not done a CDL switch mod you have to do this 1st before the 7 pin mod otherwise you wont be able to lock your center diff.
I did this vid back in 2015

I

Wednesday, June 8, 2022

Paint sceme

 Been debating for years what to do with the paint sceam.

Do I keep the UCA46 cladding color or go with a white bottom & silver top?

I have debated to put on black kut snake black fenders.
I can unscrew them for serious wheelin.
Or go monster crazy.
Or some how put my broken stock fenders back on.